On an internet where spammers and malicious bots are on the rampage, reCAPTCHA is a low-effort, highly effective way to shield your WordPress website from unwanted assaults.
Many WordPress users resort to turning off comments on their websites when spam comments get out of hand
By adding reCAPTCHA to WordPress, you keep spammers and bots at bay.
In this tutorial, you’ll learn how to add reCAPTCHA to your WordPress website one step at a time.
- Frequently Asked Questions
- What You’ll Need Add reCAPTCHA to WordPress
- How to add reCAPTCHA to WordPress
- 3 Steps to Add reCAPTCHA to WordPress
- Step #1: Installing and Activating the reCAPTCHA Plugin
- Step #2: Setup Google reCAPTCHA to Get API Keys
- Step #3: Add reCAPTCHA to WordPress
- More Helpful WordPress Tutorials:
- Wrapping up
Frequently Asked Questions
What is the Best reCAPTCHA Plugin For WordPress?
The best plugin for reCAPTCHA depends on the type of form you are adding reCAPTCHA to WordPress. Some WordPress forms come with their reCAPTCHA configuration.
However, the most widely accepted plugin is the Google reCAPTCHA plugin by BestWebSoft, as it supports almost all WordPress forms.
What is the Best Way to Add a reCAPTCHA to a WordPress Site?
Since there’s no native functionality for reCAPTCHA in WordPress, the best and only way to add reCAPTCHA to a WordPress website is to use a plugin.
You may need more than one plugin to add reCAPTCHA if you use different form plugins, as each form might have a special reCAPTCHA plugin they work with.
What You’ll Need Add reCAPTCHA to WordPress
- A reCAPTCHA Plugin: There are several reCAPTCHA plugins in the WordPress plugin directory. We’ll use the Google reCAPTCHA plugin by BestWebSoft for this tutorial. Of course, you can use any other one.
- WordPress Admin Access: Adding reCAPTCHA to a WordPress website requires admin or super admin-level access to the website in question. You need access to the WordPress admin dashboard.
- A Google Account: You need to set up a reCAPTCHA account for your website on Google’s official reCAPTCHA website. To do that, you must have a Google account.
How to add reCAPTCHA to WordPress
CAPTCHA stands for Completely Automated Public Turing test to tell Computer and Human Apart.
It’s a website protection test that is usually easy for humans to solve but uncrackable for malicious bots and software.
You’ve probably come across one website before. After filing a form, you tick a box to verify that you are not a bot, as in the screenshot below.

By checking this box, you either pass the test and are taken to the next page, or a set of images pop up for you to identify similar objects.
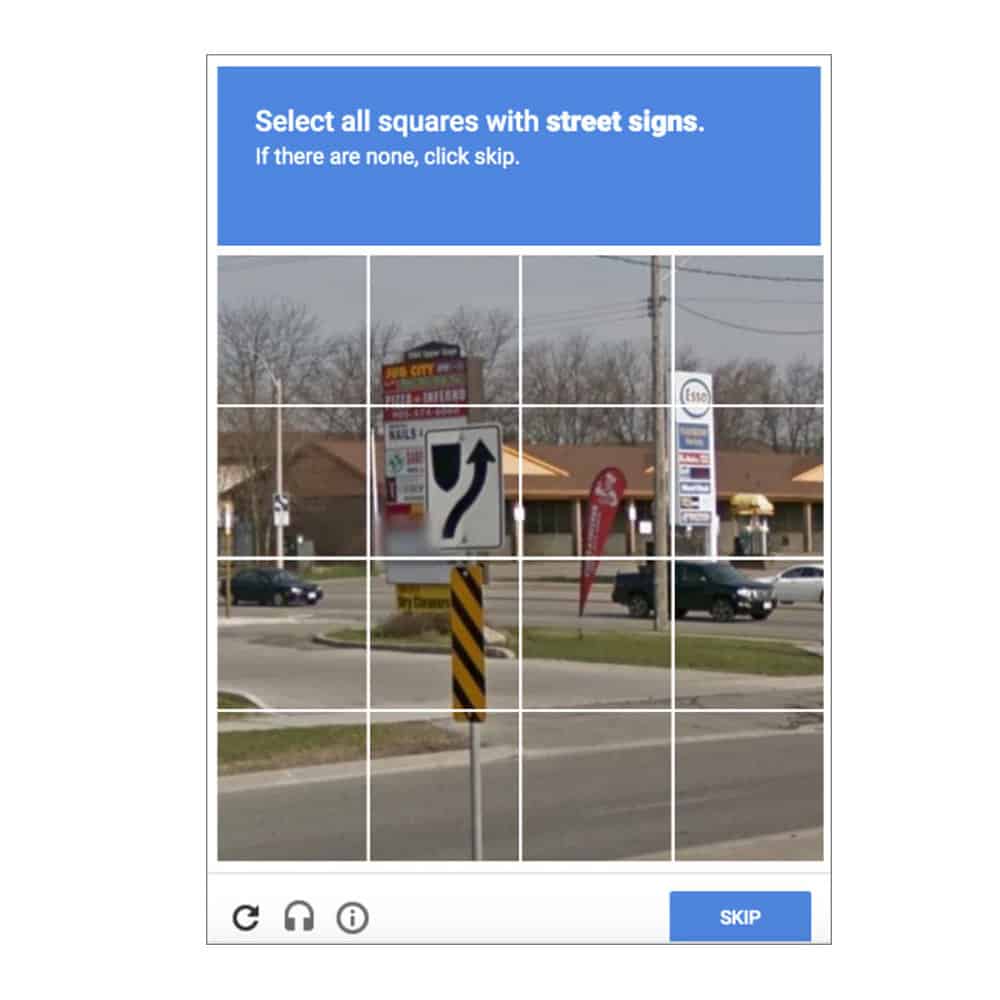
If you don’t like the idea of interrupting your users, you can still add reCAPTCHA to WordPress using the invisible reCAPTCHA from Google.
The invisible reCAPTCHA handles bot detection behind the scenes so that your users can browse your site as they usually do.
Adding reCAPTCHA to WordPress is ridiculously simple.
Next, we’ll show you how to add visible and invisible reCAPTCHA to WordPress. Let’s go
3 Steps to Add reCAPTCHA to WordPress
Adding Google reCAPTCHA to your WordPress website involves three steps.
- Step #1: Installing and Activating the reCAPTCHA plugin
- Setup Google reCAPTCHA to Get API Keys
- Step #3: Add reCAPTCHA to WordPress
Step #1: Installing and Activating the reCAPTCHA Plugin
The first step to add reCAPTCHA to WordPress is to install and activate the Google reCAPTCHA plugin by BestWebSoft.

If you are unsure how to do that, follow this guide on installing WordPress plugins.
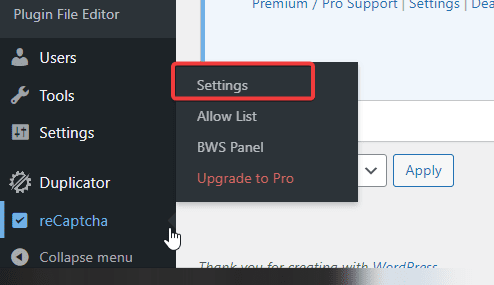
After activating the plugin, go to your dashboard, locate reCAPTCHA on the left panel, and select Settings from the options.
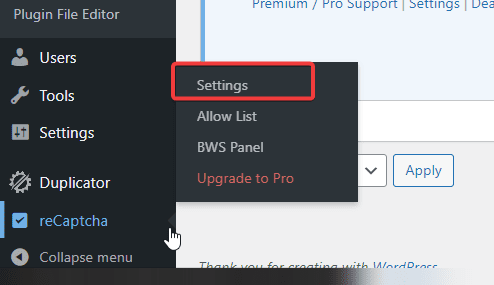
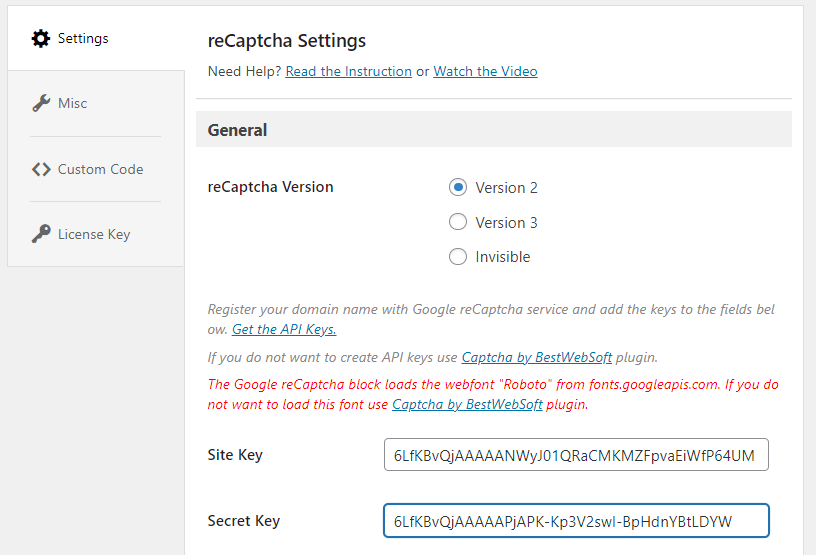
On this page, you are to provide two keys to activate reCAPTCHA, a Site key, and a Secret key.
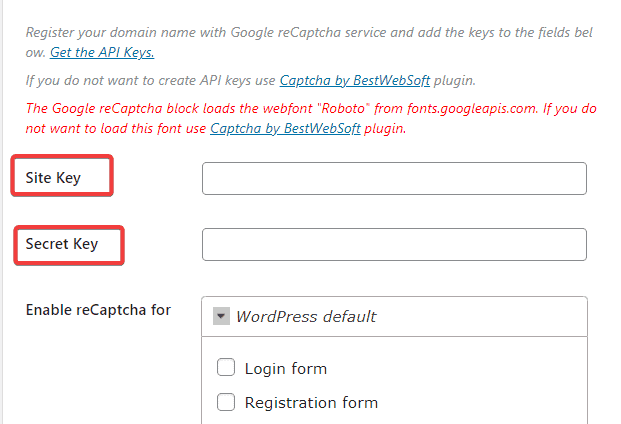
You’ll first register your domain on the Google reCAPTCHA website to get these keys. That’s step #2.
Step #2: Setup Google reCAPTCHA to Get API Keys
Open your browser and visit the official Google reCAPTCHA website.
Alternatively, you can click the link that read “Get the API keys” at the top of the plugin configuration page. See the screenshot above.
You’ll need a Google account to proceed. If you have a Google email account, you already have a Google account.
Enter your email and click the Next button.
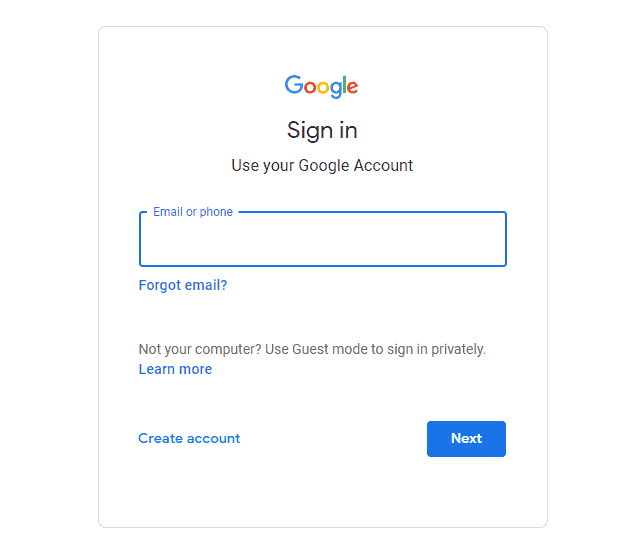
Once done, you’ll be taken to the registration page, where you need to enter some basic information about your website.
The first field you’ll see is the Label field, type in any name of your choice.
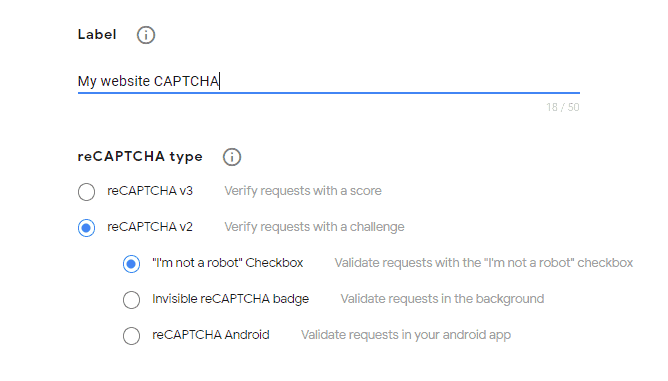
Under it, choose the type of reCAPTCHA you want by clicking the radio button next to each.
There are four reCAPTCHA options you can select from. Let’s briefly look at what each means to help you make the best decision.
- reCAPTCHA v3 is a behind the scene type of reCAPTCHA that validates users’ requests via Javascript API and does not require user interaction.
- reCAPTCHA v2 ( “I’m not a robot” Checkbox) requests the user to tick a box to confirm the user is not a bot.
- reCAPTCHA v2 ( invisible reCAPTCHA badge): This does not require any action from the user. It’s invoked as a response to suspicious users’ behavior.
- reCAPTCHA v2 (reCAPTCHA Android) is used to validate requests on Android Apps.
reCAPTCHA v2 ( “I’m not a robot” Checkbox) is the most-used type of reCAPTCHA, and that’s what we’ll be going for in this guide.
So select the reCAPTCHA v2 radio button and choose the “I’m not a robot” Checkbox from the three options under it.
Next, move to the Domains section and add the URL of your WordPress website.
You can add as many domains as possible by clicking the Plus icon.
This comes in handy if you have more than one website, as you can use the same API keys to add reCAPTCHA to multiple websites.
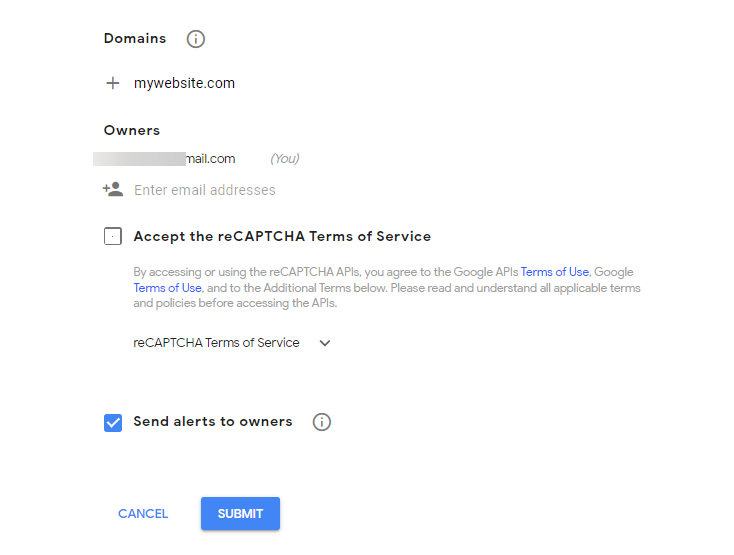
In the owner section, you’ll input your email. Google will automatically add your Gmail already.
You can add more emails by clicking the Plus Profile icon.
After that, tick the box next to Accept the reCAPTCHA Terms of service.
You can also check the Send alert to owners box. Google will email notifications when they detect suspicious activities on your site.
Once done, click the SUBMIT button to register your site.
Next, you’ll see a notification that your website has been registered.
On the same page, Google reCAPTCHA will provide you with the Site and Secret keys. Leave this page open, or copy the keys to your notepad.
But don’t worry if you mistakenly close this page. You can easily retrieve the API keys by going to the Google reCAPTCHA settings page.
Now that you have your reCAPTCHA API keys, the next step is to add reCAPTCHA to WordPress.
Step #3: Add reCAPTCHA to WordPress
Go back to your WordPress admin dashboard, locate reCAPTCHA on the left panel, and select Settings from the options.
Once the page opens, under the General section, select reCAPTCHA version 2, then scroll down to paste the Site key and Secret key you got from Google into their respective fields.
Afterward, you can select where to enable reCAPTCHA on your website in the Enable reCAPTCHA for section.
Then, use the checkbox next to each to select and unselect.
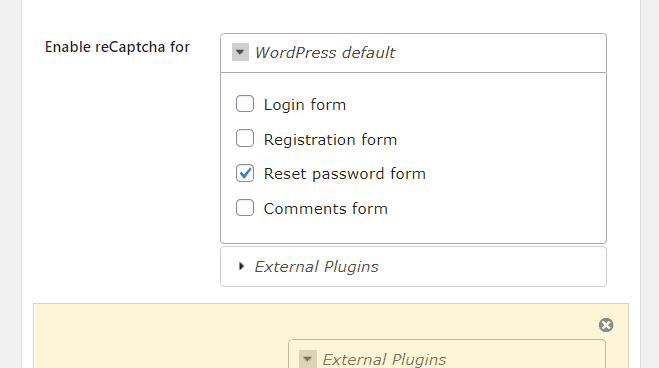
Based on your selection, the plugin will now add reCAPTCHA verification to your login forms, comment forms, registration forms, and password reset forms.
You can also disable reCAPTCHA for some of your WordPress users.
Scroll to the Hide reCAPTCHA section and check the boxes to exclude users.
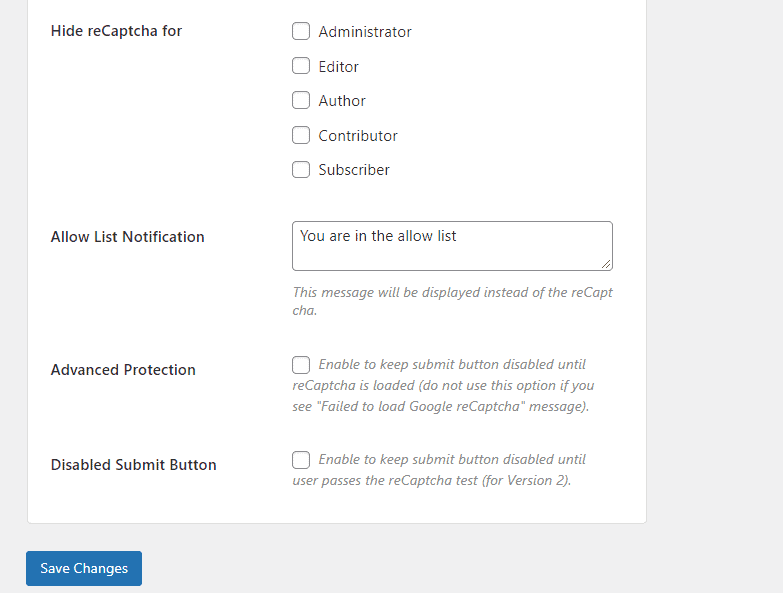
If you like, use Advanced Protection to hide the submit button until the reCAPTCHA is loaded.
You can also Disable Submit Button so users can’t use them except after passing the reCAPTCHA test.
Once satisfied with your configuration, click the Save Changes button to activate reCAPTCHA.
And that’s all. You have successfully added reCAPTCHA to WordPress. Henceforth, before users can fill out any form on your website, they must pass the reCAPTCHA test first.
More Helpful WordPress Tutorials:
- How To Stop Spam Comments: Getting frustrated with spam comments on your WordPress website? Not anymore. You can stop spam comments with a few clicks by following this guide.
- How to Prevent Search Engines From Indexing WordPress: Have pages you don’t want users to see in search results? Learn how to stop Google and other search engines from Indexing WordPress.
- How to Remove Malware From WordPress: If you own a WordPress website, you’ll have to deal with malware at some point, whether you like it or not. Learn everything about WordPress malware removal in this guide.
Wrapping up
Typically, anywhere you have a form on your website, you need reCAPTCHA to checkmate bots and spam messages.
So adding reCAPTCHA to WordPress is one of the WordPress security basics that every website owner should know.
With reCAPTCHA on WordPress, you spam-proof your WordPress website and preserve your brand’s reputation without expending much effort.
We hope this article guide you to add reCAPTCHA to your WordPress website. If you need any help, reach out in the comment section below.
We’ll be glad to help.
Meta Description: One of the easiest ways to Keep malicious bots out of your WordPress website is to add reCAPTCHA to WordPress. Learn how in this guide.


