Are you stuck installing PHP while setting up a local server for running WordPress? Don’t know where to start or where to get information on how to install PHP?
PHP is necessary when setting up a WordPress test server. Even WordPress and plugins are built using PHP.
Fortunately, you’re in the right place.
In this article, we will share how you can install PHP on different operating systems, such as Windows and MacOS.
In no time, you’ll be working with your WordPress test server.
Frequently Asked Questions
Below we have provided an answer to one of the most common questions on how to install PHP.
Do I Need to Install PHP?
To run a WordPress test server or staging site locally, you must install PHP. Otherwise, you won’t be able to run the test server, as any WordPress development needs PHP to run.
How to Install PHP: What You’ll Need
To install PHP, here are some of the tools, apps, and prerequisites you may require.
- Database: You must download and set up a database to store data and your files. MySQL is a perfect candidate.
- Install Wizard: You need to download and install a local server if you haven’t already. XAMPP is a fantastic option for Windows users because it bundles PHP, MySQL, and Apache together.
- Local Web server: You can only run PHP on a web server. So you need to set one up on your device.
- PHP: You’ll need to download PHP. You can download PHP from the PHP website downloads page (here). If unsure which version of PHP to use, download the latest PHP version.
How To Install PHP: Step-By-Step Instructions
Note that PHP and apache come preinstalled with all Apple Macbooks. We’ll only show you how to activate it.
For Windows, you need to install PHP from scratch.
How to Install PHP on Windows
Below, we’ll share how to set up a local web server on Windows that installs PHP.
Windows doesn’t come bundled with PHP or apache. Rather than going through some elaborate setup, we recommend using XAMPP to set up your local web server.
It also comes with PHP. To download and install XAMPP, follow the steps below.
STEP 1: Download XAMPP for Windows from the official site.

STEP 2: Launch the installer. Click “Yes” on the “Do you want this app to make changes to this computer” prompt.
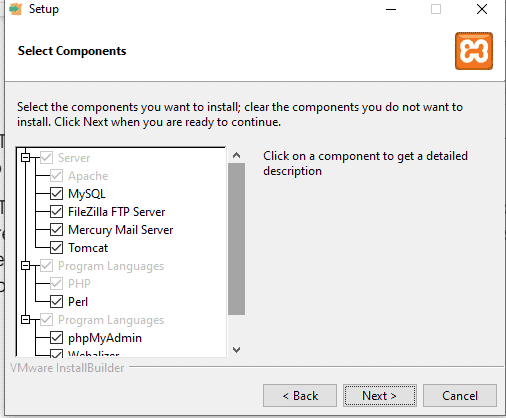
STEP 3: Select the components you want to install.
PHP and Apache are pre-checked and can’t be changed.
If you’re only interested in setting up a web server, you can install only Apache and PHP.
However, since you’re working with WordPress, you must install other languages and servers, including MySQL and FileZilla FTP Server.

STEP 4: Click “Next” and then choose the file location to install XAMMP.
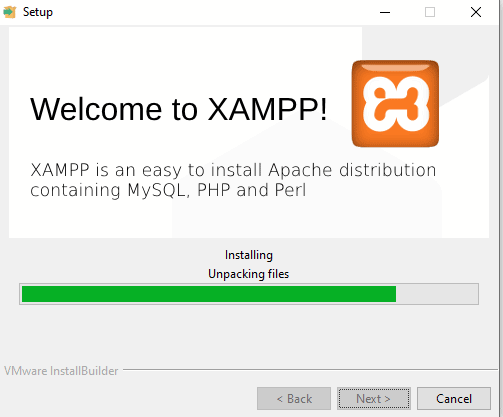
STEP 5: Choose your preferred language. Click “Next” and wait for the installer to complete the work.
STEP 6: Click “Finish to complete the installation.

How to Run a PHP File in XAMPP
To run your PHP files in XAMPP is straightforward. You can do so with these few steps.
STEP 1: Save your script as a .PHP file.
STEP 2: Store or move the file from above to the “HTDocs” subfolder in your XAMPP folder.
The file path should be “C:xampphtdocs,” except you change XAMPP’s location during setup.
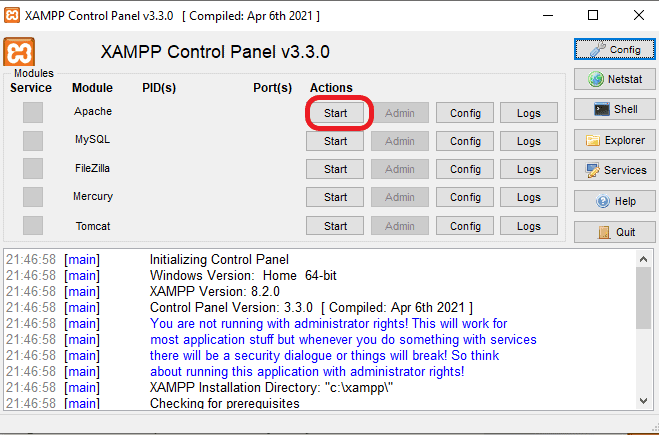
STEP 3: Launch the XAMPP control panel and click the “start” button. If it’s running, the “Apache” word will have a green background.

STEP 4: Launch any web browser and type the word “localhost” + the name of your script into the address bar.
So if you saved the script as home.php, enter the address below into your browser:
http://localhost/home.phpHow to Install PHP on MacOS
Just to reiterate, PHP and Apache come preinstalled on Mac. You, however, need to “activate” it. Here how:
STEP 1: Locate the Apache config file. You’ll likely find it in this file path:
/private/etc/apache2/httpd.confSTEP 2: Open it and find these two lines:
# LoadModule php5_module libexec/httpd/libphp5.so
# AddModule mod_php5.c
STEP 3: Delete the “#” at the beginning of each line.
LoadModule php5_module libexec/httpd/libphp5.so
AddModule mod_php5.c
PHP is now active on your Mac.
How to Run a PHP File on MacOS
Follow the steps below to run a PHP file on Mac.
STEP 1: Locate the folder with the PHP file you want to run.
STEP 2: Select the folder (without opening it) and right-click. Choose the “New Terminal at Folder” option from the popup menu.
STEP 3: In the terminal window, type the code below:
php -S localhost:9000Do not close the terminal till you’re done. Closing the terminal ends the server.
STEP 4: Open any browser and type:
http://localhost:9000/If there’s an index.php file in the folder, the code below will run it. Otherwise, you have to specify a file name to the above code.
http://localhost:9000/home.phpSTEP 5: When done, go back to the terminal and press CTRL + C to end the server and exit the terminal.
Similar Tutorials to Check Out: How to Install WordPress
The tutorials below simplify some of the technical challenges you may face when using WordPress.
- How to Hire a WordPress Developer: If all these codes and installations make your brain recoil, you can hire a WordPress developer to help. Here’s how to get one successfully.
- How to Uninstall WordPress From cPanel: There are many ways to install and uninstall WordPress. Learn how to use the cPanel to uninstall WordPress.
- How to Install WordPress Locally: Want to set up a WordPress staging site locally and don’t know where to start? This tutorial shows you how.
Wrapping Up: How to Install PHP on MacOS and Windows
Whatever operating system you use, installing PHP is easy and won’t take any time.
PHP comes preinstalled on Mac. You only need to activate it. For Windows, the most straightforward way is to download and install XAMPP. XAMPP comes with MySQL, which you’ll need to set up a local WordPress staging site.
If you enjoyed this tutorial, bookmark it so you can return to it if need be. If you run through any problems, leave a comment below, and we’ll be happy to lend a hand.


